Using YubiKey with GPG to sign commits
Table of contents
- Intro
- Wait! Yubi... what?
- What is OpenPGP
- Generate GPG keypair
- Adding public key to GitHub
- Move your GPG keys to YubiKey
- Update public key URL
- Useful links
Intro
Lately I was reading a lot about so-called hardware security tokens and tried to find their practical usage for myself. It was decided to conduct an experiment and give it try. TOTP, HOTP, FIDO2,WebAuthn, PGP and resident SSH keys - these are the things I saw in front of me during the next couple of weeks. Now I can say with no doubts that the experiment succeeded, and it's hard to imagine my daily activities without ✨YubiKey✨.
Wait! Yubi... what?
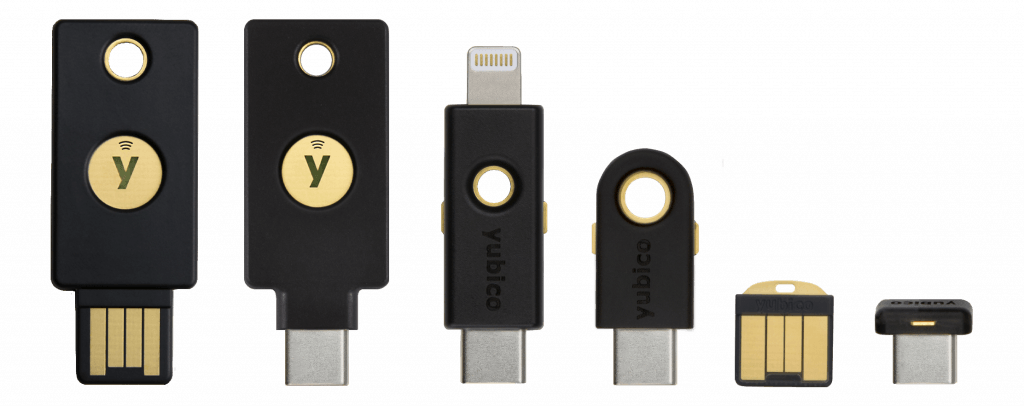
YubiKey. It's one of the many hardware security tokens available in the market, but at the same time I guess it's the most popular one. It provides high level of security and supports many common authentication mechanisms, some of which were mentioned above.
The thing is that this little key is capable of keeping your private keys in such a way that it's impossible to take them out of it, even by cracking and reverse-engineering the key.
It all sounds nice, but let's see what we can use it for. My personal top features list is the following:
- Ability to use it as a second factor instead of TOTP codes and SMS/Push notifications
- Ability to use it for TOTP 2FA on websites that doesn't yet support WebAuthn
- Storing GPG keys for signing and encrypting data (and Git commits)
Yubi (指) means finger in Japanese, and the key is a key. So YubiKey.
What is OpenPGP
OpenPGP is the most widely used email encryption standard. It is defined by the OpenPGP Working Group of the Internet Engineering Task Force (IETF) as a Proposed Standard in RFC 4880. OpenPGP was originally derived from the PGP software, created by Phil Zimmermann.OpenPGP Website
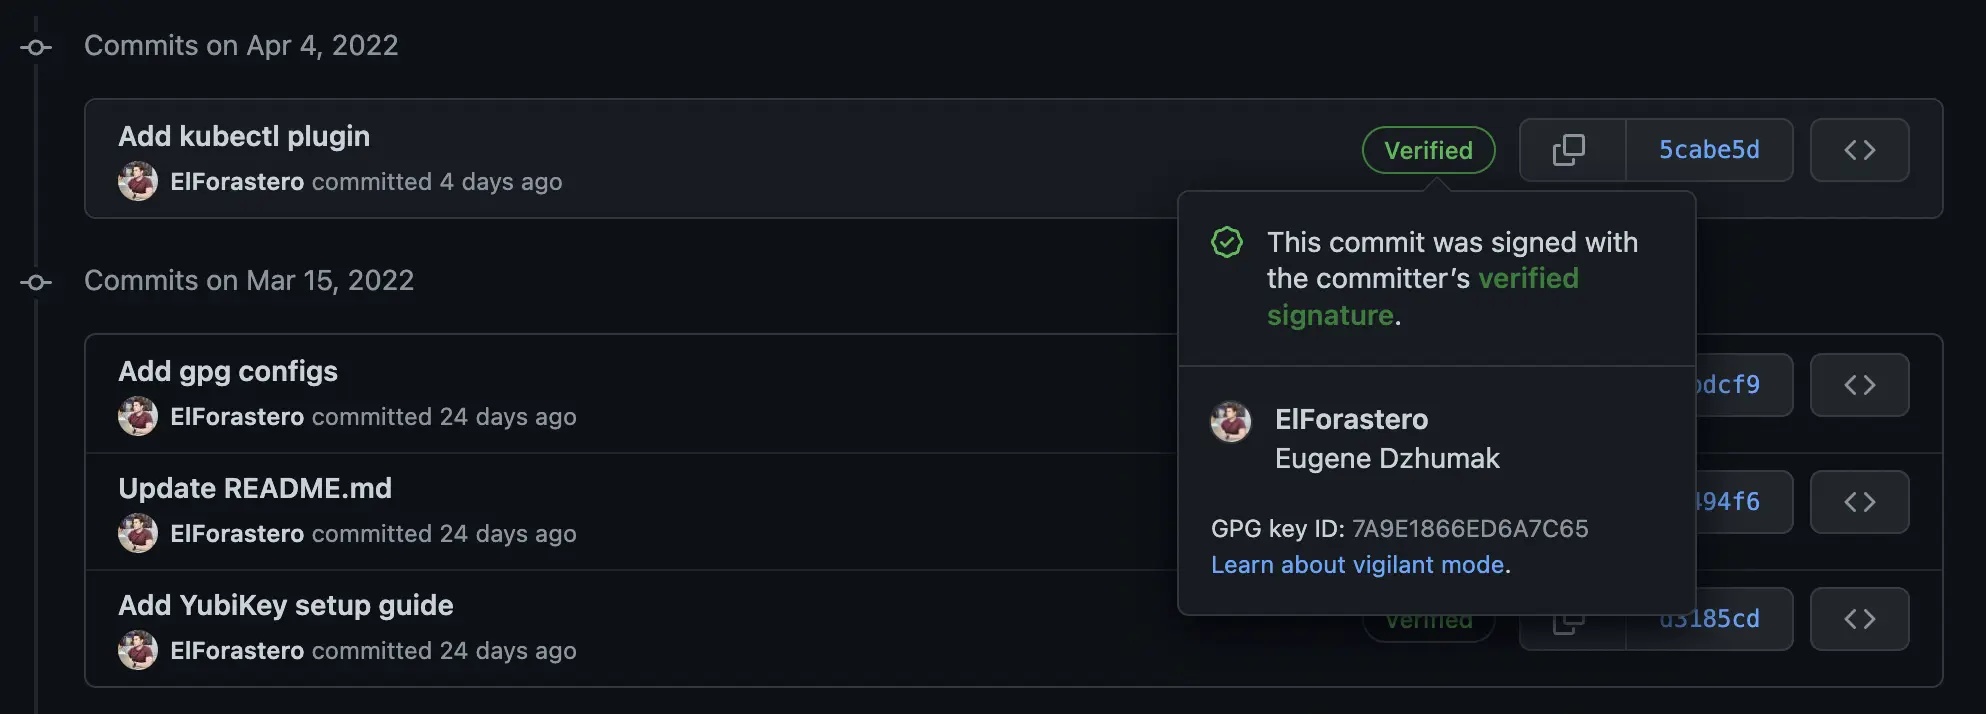
One of the complete and free implementations of OpenPGP standard is GnuPG with the help of which we are going to add a signature to our git commits.
Generate GPG keypair
It stands for GNU Privacy Guard
- an open source software for encrypting and signing messages and files.
This time I would like to consider the last case and show how YubiKey may be used for signing Git commits, but first we have to get familiar with GPG.
Install it using your favorite package manager:
brew install gpg
Ensure that you have gpg v2 installed (v1 may have some issues):
$ gpg --version
gpg (GnuPG) 2.3.4
libgcrypt 1.10.0
Copyright (C) 2021 Free Software Foundation, Inc.
License GNU GPL-3.0-or-later <https://gnu.org/licenses/gpl.html>
This is free software: you are free to change and redistribute it.
There is NO WARRANTY, to the extent permitted by law.

Home: /Users/eugenedzhumak/.gnupg
Supported algorithms:
Pubkey: RSA, ELG, DSA, ECDH, ECDSA, EDDSA
Cipher: IDEA, 3DES, CAST5, BLOWFISH, AES, AES192, AES256, TWOFISH,
        CAMELLIA128, CAMELLIA192, CAMELLIA256
AEAD: EAX, OCB
Hash: SHA1, RIPEMD160, SHA256, SHA384, SHA512, SHA224
Compression: Uncompressed, ZIP, ZLIB, BZIP2
Here we go. Now when you have GPG installed, insert your YubiKey and check if it was detected successfully:
gpg --card-status
You should get something similar to this, which means YubiKey was detected. If you have multiple YubiKeys inserted, check the "Serial Number" row to figure out which one gpg is looking at:
Reader ...........: Yubico YubiKey FIDO CCID
Application ID ...: D2760001240100000006115270510000
Application type .: OpenPGP
Version ..........: 0.0
Manufacturer .....: Yubico
Serial number ....: xxxxxxxx
Name of cardholder: [not set]
Language prefs ...: [not set]
Salutation .......:
URL of public key : [not set]
Login data .......: [not set]
Signature PIN ....: not forced
Key attributes ...: rsa2048 rsa4096 rsa2048
Max. PIN lengths .: 127 127 127
PIN retry counter : 3 0 3
Signature counter : 0
KDF setting ......: off
UIF setting ......: Sign=off Decrypt=off Auth=off
Signature key ....: [none]
Encryption key....: [none]
Authentication key: [none]
General key info..: [none]
New it's time to generate a few keys. The first thing to consider is key type:
[C]for Certification[E]for Encryption[S]for Signing[A]for Authentication
The most complete guide about different key types and proper ways to use them I've found on GitHub: drduh/YubiKey-Guide. If you will eventually decide to give YubiKey a try, please set up everything based on that guide. It's really profound and covers many security topics I don't mention in this introduction, like disconnecting from the network, cleaning up after generation, backups and much more.
gpg --full-generate-key
This command runs an interactive key generation. Answer the questions according to your preferences:
Please select what kind of key you want:
   (1) RSA and RSA
   (2) DSA and Elgamal
   (3) DSA (sign only)
   (4) RSA (sign only)
   (9) ECC (sign and encrypt) *default*
  (10) ECC (sign only)
  (14) Existing key from card
Your selection? 1
RSA keys may be between 1024 and 4096 bits long.
What keysize do you want? (3072) 4096
Requested keysize is 4096 bits
Please specify how long the key should be valid.
         0 = key does not expire
      <n>  = key expires in n days
      <n>w = key expires in n weeks
      <n>m = key expires in n months
      <n>y = key expires in n years
Key is valid for? (0) 0
Key does not expire at all
Is this correct? (y/N) y

GnuPG needs to construct a user ID to identify your key.

Real name: Eugene Dzhumak
Email address: eugene.dzhumak@gmail.com
Comment:
You selected this USER-ID:
    "Eugene Dzhumak <eugene.dzhumak@gmail.com>"

Change (N)ame, (C)omment, (E)mail or (O)kay/(Q)uit? O
We need to generate a lot of random bytes. It is a good idea to perform
some other action (type on the keyboard, move the mouse, utilize the
disks) during the prime generation; this gives the random number
generator a better chance to gain enough entropy.
gpg: revocation certificate stored as '/Users/eugenedzhumak/.gnupg/openpgp-revocs.d/0066BFDC90E6276F3118E6DF6ACBBAB54865773A.rev'
public and secret key created and signed.

pub   rsa4096/0x6ACBBAB54865773A 2022-04-08 [SC]
      Key fingerprint = 0066 BFDC 90E6 276F 3118  E6DF 6ACB BAB5 4865 773A
uid                              Eugene Dzhumak <eugene.dzhumak@gmail.com>
sub   rsa4096/0x3A634384F3A13C52 2022-04-08 [E]
- Generate 2 RSA keys (
[SC] + [E]) - Set keysize to 4096 bits
- Choose to never expire your keys (not a good idea)
- Confirm that keys won't expire at all
- Enter your "Real Name", "Email address" and an optional comment
- And finally, confirm that everything is (O)kay by entering "O"
✨Congratulations!✨ You have just generated your first GPG keypair.
Lines 39-42 show some information about the keys. We've just generated one Primary key (pub) and one Subkey (sub). The idea of having subkeys comes from OpenPGP spec, and they are used for many purposes:
- Being able to store primary key on a more secure machine or even offline (see backups). This way we can revoke compromised subkeys easily.
- Having different subkeys on different machines, for example signing key on a build server.
- Lifetime of subkeys may be limited and much shorter that primary key. This lowers risks of infinite keys usage in case of compromising. It's possible to update subkeys expire time if we have access to primary key.
Fingerprint is just a hash-sum to verify key integrity.
Adding public key to GitHub
Having keys generated, now it's possible to export public key and add it to GitHub account:
gpg --export --armor eugene.dzhumak@gmail.com > pubkey.asc
You may wonder what is this Email address for? Thankfully GPG allows us to use Email addresses associated with keys as identifiers. Therefore, instead of copy-pasting or remembering your key fingerprint, you can just use your Email address.
It's worth mentioning that there is no limitations on number of Emails associated with your key. You are free to add as many as you need.
Example of pubkey.asc:
-----BEGIN PGP PUBLIC KEY BLOCK-----

mQINBGJQOZgBEAC+k98YKKFvvuQi1mh14px92TqQHgJ4bR21OJnuFer/yaP5NaDV
2pldKWBuZqT4R6PK+jKuizK0tpO5/n0STvPjzyHKynYAtx37SbWP13+Qw2Ulp8JT
a45EgJqrGWRDe3FxT+SGaQg0VKiMOi1a0W5ZT+wCMDe6U4KZGwqXWLOtLxCBlzAO
6Q8ttXliMVcutGWtYyDX3H3ZUA8L92+dR1M9pGrEtm6hNRYPzgytIC8d6mYTMN73
GjHJflVybQQXSNBMKhfP/9tMbwTXcvaQKTWUSbUJxrLvYN8/W6EjJdjnLat+5Rt6
HXluCD+2SJmheLiwE3hFOk4n53A8+UxNEf8r9OJWliM5bVWG4E5No2XRbAi/M9ib
...
This will export our public key in text format. Open it with your favorite text editor and copy all the lines. Or if
are a MacOS user, simply pipe the output to pbcopy tool to copy the output into clipboard:
gpg --export --armor eugene.dzhumak@gmail.com | pbcopy
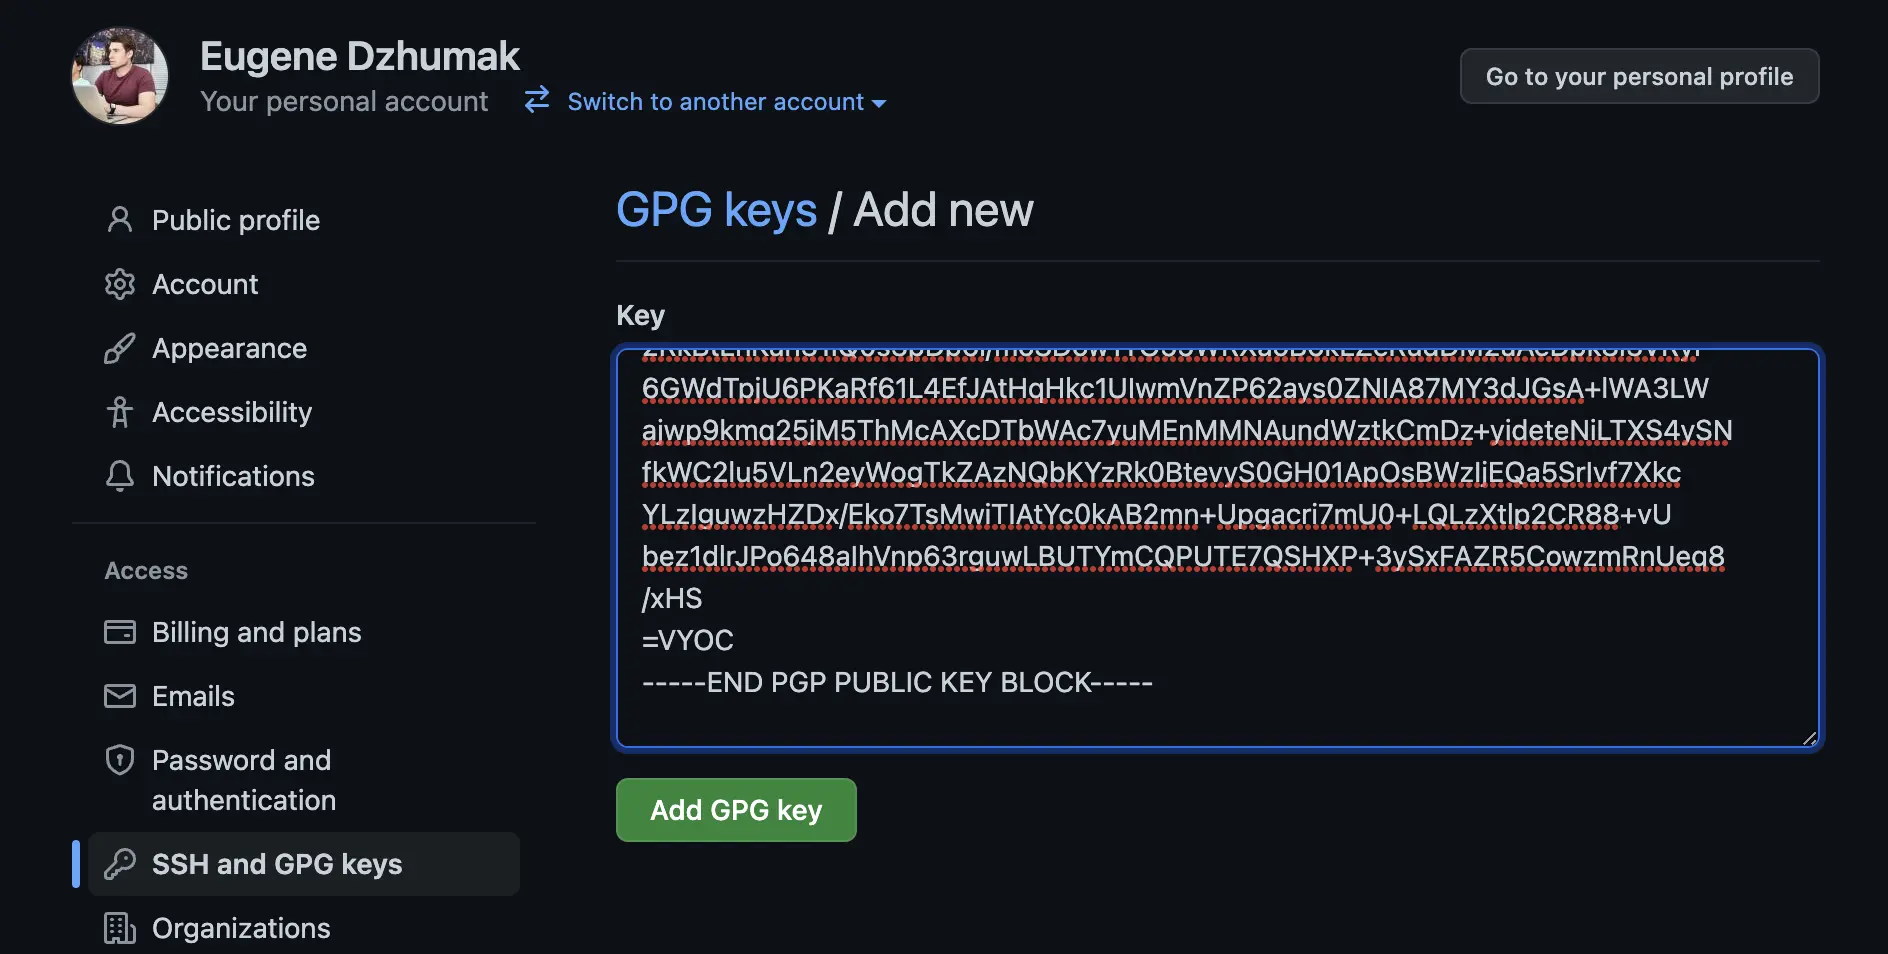
Go to your GitHub SSH and GPG keys preferences and add a new GPG public key:
Finally, try to commit something using --gpg-sign=<keyid> or -S<keyid> (details):
git commit -m "Update readme" --gpg-sign=0x6ACBBAB54865773A
To ensure that the commit was signed successfully:
$ git log --show-signature HEAD^..HEAD
commit 6bc765213c3bb87cc69c5856fb8836cb50b23f21 (HEAD -> master)
gpg: Signature made пятница,  8 апреля 2022 г. 20:55:40 +04
gpg:                using RSA key 0066BFDC90E6276F3118E6DF6ACBBAB54865773A
gpg: Good signature from "Eugene Dzhumak <eugene.dzhumak@gmail.com>" [ultimate]
Primary key fingerprint: 0066 BFDC 90E6 276F 3118  E6DF 6ACB BAB5 4865 773A
Author: Eugene Dzhumak <eugene.dzhumak@gmail.com>
Date:   Fri Apr 8 20:55:39 2022 +0400

    Update readme
(END)
Push the changes and verify them on GitHub:
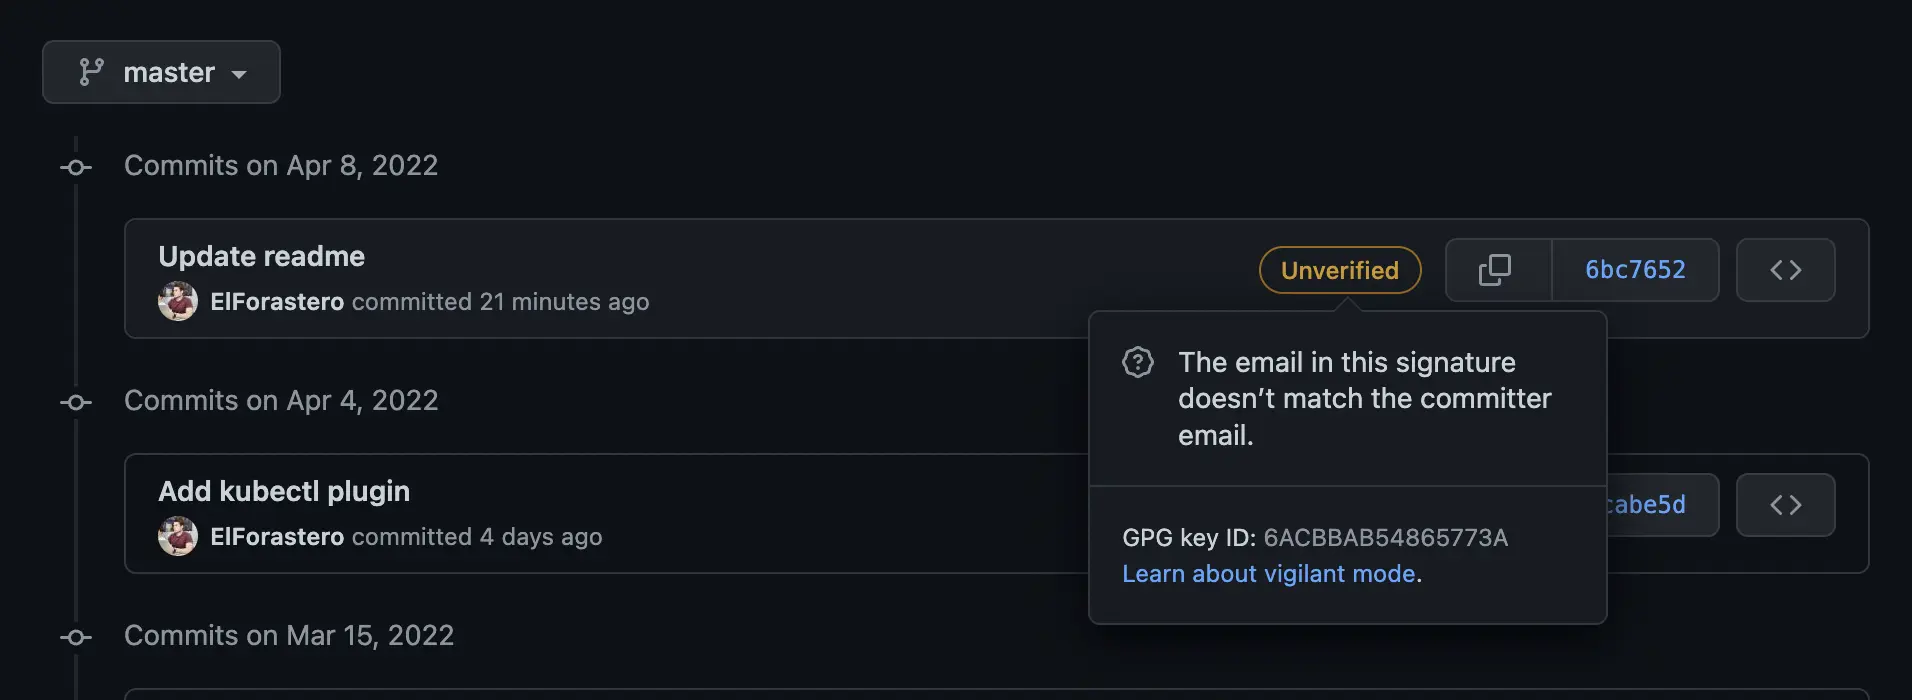
In order to have a green "Verified" badge, you have to add the Email used in GPG sign to GitHub and confirm it, or you may attach second Email to GPG key. It's up to you.
$ gpg --edit-key <key-id>
gpg> adduid
Real Name: Eugene Dzhumak
Email address: mysecondemail@example.com
Comment: <comment or Return to none>
Change (N)ame, (C)omment, (E)mail or (O)kay/(Q)uit? O
Enter passphrase: <password>
gpg> uid 2
gpg> trust
Your decision? 5
Do you really want to set this key to ultimate trust? (y/N) y
gpg> save
Note that newly added Email won't be trusted by default and it's required to change trust level manually.
- 1 = I don't know or won't say
- 2 = I do NOT trust
- 3 = I trust marginally
- 4 = I trust fully
- 5 = I trust ultimately
Move your GPG keys to YubiKey
Well, you may ask what role the YubiKey plays it this GPG story? Now when we have working and configured GPG keys, it's possible to move them to YubiKey. In other words the next step will write our keys directly to the YubiKey's internal memory and make them portable.
$ gpg --edit-key 0x6ACBBAB54865773A
Secret key is available.

sec  rsa4096/0x6ACBBAB54865773A
     created: 2022-04-08  expires: never       usage: SC
     trust: ultimate      validity: ultimate
ssb  rsa4096/0x3A634384F3A13C52
     created: 2022-04-08  expires: never       usage: E
[ultimate] (1).  Eugene Dzhumak <eugene.dzhumak@gmail.com>

gpg> key 1

sec  rsa4096/0x6ACBBAB54865773A
     created: 2022-04-08  expires: never       usage: SC
     trust: ultimate      validity: ultimate
ssb* rsa4096/0x3A634384F3A13C52
     created: 2022-04-08  expires: never       usage: E
[ultimate] (1).  Eugene Dzhumak <eugene.dzhumak@gmail.com>

gpg> keytocard
Please select where to store the key:
   (2) Encryption key
Your selection? 2

Replace existing key? (y/N) y

sec  rsa4096/0x6ACBBAB54865773A
     created: 2022-04-08  expires: never       usage: SC
     trust: ultimate      validity: ultimate
ssb* rsa4096/0x3A634384F3A13C52
     created: 2022-04-08  expires: never       usage: E
[ultimate] (1).  Eugene Dzhumak <eugene.dzhumak@gmail.com>

gpg> save
After entering gpg --edit-key an interactive shell will appear. To transfer one of the keys to YubiKey, first select
it with key N (line 11). Note an asterisk mark appeared near the key title: ssb* (line 16).
Now start transferring by typing keytocard command (line 20), choose the key type (23) and confirm thegg operation (25).
Save and quit (line 34).
Update public key URL
To use YubiKey on new machine, public key is required. If you have added GPG key to GitHub account, it should be available by
https://github.com/<username>.gpg. E.g. https://github.com/elforastero.gpg.
Update your Smart Card and set this URL as a location where the public key could be found:
$ gpg --card-status

URL of public key : [not set]
$ gpg --edit-card

gpg/card> admin
Admin commands are allowed

gpg/card> url
URL to retrieve public key: https://github.com/elforastero.gpg

gpg/card> quit
Check card status again:
$ gpg --card-status

URL of public key : https://github.com/elforastero.gpg
Now, while using YubiKey on a new computer, enter GPG interactive mode and type fetch to pull that public key
from the remote:
$ gpg --edit-card

gpg/card> fetch

gpg: requesting key from 'https://github.com/elforastero.gpg'
gpg: key 0x6ACBBAB54865773A: public key "Eugene Dzhumak <eugene.dzhumak@gmail.com>" imported
gpg: Total number processed: 1
gpg:               imported: 1

gpg/card> quit
❤️ Let's keep our data private and safe.
